Have you ever landed on a WordPress website and seen strange warnings, blocks of code, or error messages at the top of the page? It’s not a hack, and your site isn’t necessarily broken. What you’re seeing is most likely you didn’t Disable Debug In WordPress.
Debugging tools are a powerful part of the WordPress core, but when left on in a live environment, they can become more of a problem than a solution. If you’re not actively working on fixing issues or developing your site, keeping debug mode on is unnecessary—and in some cases, even risky.
In this guide, you’ll learn exactly how debug mode works, why it’s showing up on your site, and most importantly, how to safely and completely turn it off so your visitors don’t see confusing or alarming error messages.
Table Of Contents
What Is WordPress Debug Mode?
Let’s start with the basics.
WordPress has a built-in debugging feature that’s mostly used by developers. When you enable it, the system starts displaying any PHP errors, warnings, or notices that occur while your site runs. These messages can point to problems in your theme, plugins, or custom code.
That’s incredibly useful when you’re trying to figure out why something on your site isn’t working. But if your website is live and public, showing these messages to your users is never a good idea. Leaving WordPress debug mode enabled on a live site can expose sensitive information that hackers might use to attack your website. Error messages can reveal file paths, plugin names, theme structures, or even parts of your code—details that should stay private. This kind of information can help attackers find weak points in your site’s setup, making it easier for them to exploit known vulnerabilities and use that to bypass wordpress login or change the wordpress password. That’s why it’s important to always disable debug mode in wordpress when your site is not under development.
Here’s why you should disable debug in WordPress:
- Error messages look unprofessional and can scare visitors.
- They might reveal sensitive file paths or technical details.
- They give a negative impression, especially to non-technical users.
So unless you’re actively fixing or building something, debug mode should always be off on a production (live) website.
How to Check and Disable Debug in WordPress
Luckily, it doesn’t take a developer to fix this issue. You don’t need to install any plugins or hire anyone. All it takes is a quick edit to a single file.

Here’s exactly what to do:
- Log in to your hosting account. This could be through cPanel, DirectAdmin, or any custom dashboard your hosting provider offers.
- Open the File Manager. You’ll usually find it in the main dashboard after logging in.
- Navigate to your website’s root folder. In most cases, this is public_html.
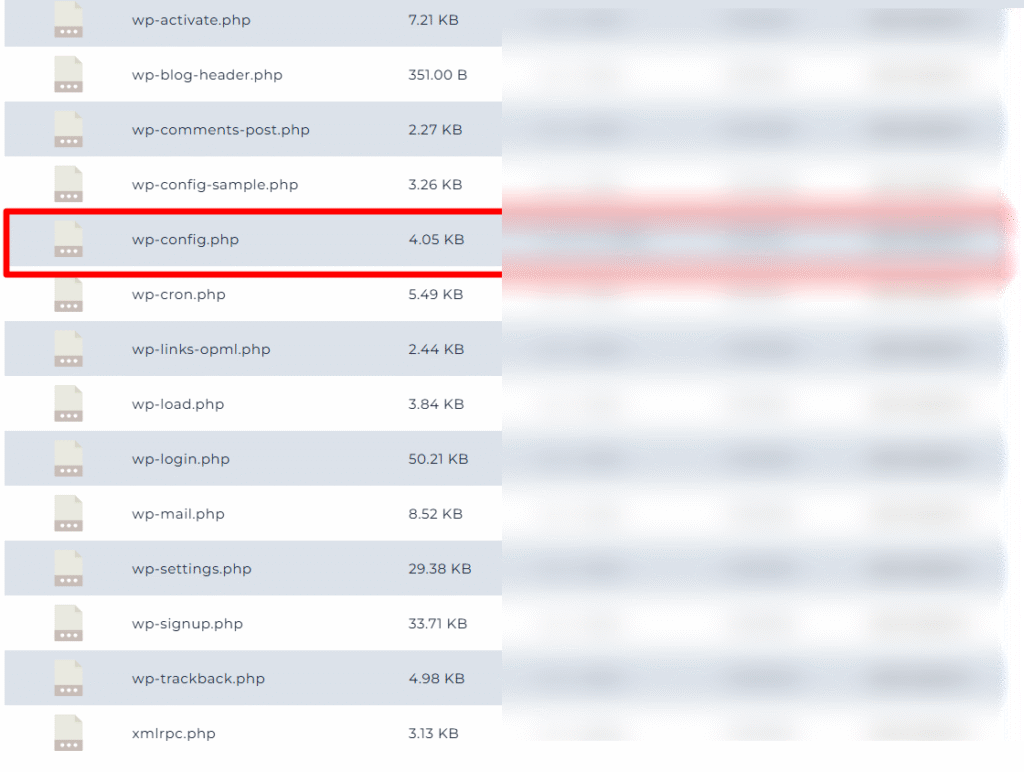
- Look for the wp-config.php file. This is the file that contains some of WordPress’s most important settings.
- Right-click on wp-config.php and select Edit.
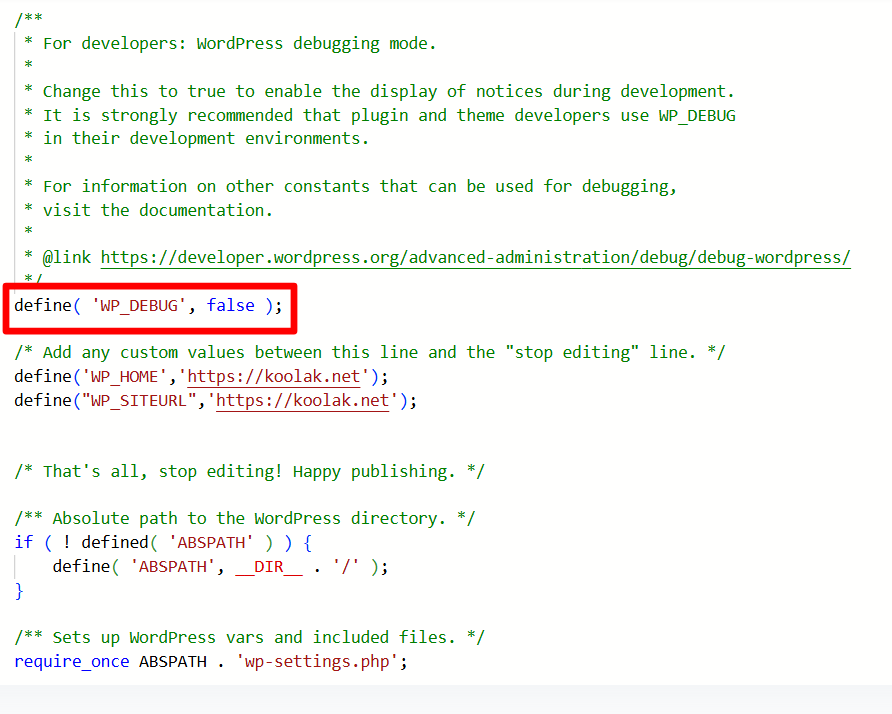
- Scroll through the file until you find this line:
define( 'WP_DEBUG', true );If it says true, that means debug mode is currently active.
To disable debug mode in wordpress, simply change true to false, like this:
define( 'WP_DEBUG', false );
Then save the file.
That’s it—you’ve just turned off debug mode. However, sometimes this one change isn’t enough to completely hide all error messages. Let’s talk about what to do in those situations.
Still Seeing Errors? Here’s the Full Fix
Some users notice that even after changing WP_DEBUG to false, warnings or notices are still showing on their site. This usually happens because of additional PHP settings on the server.
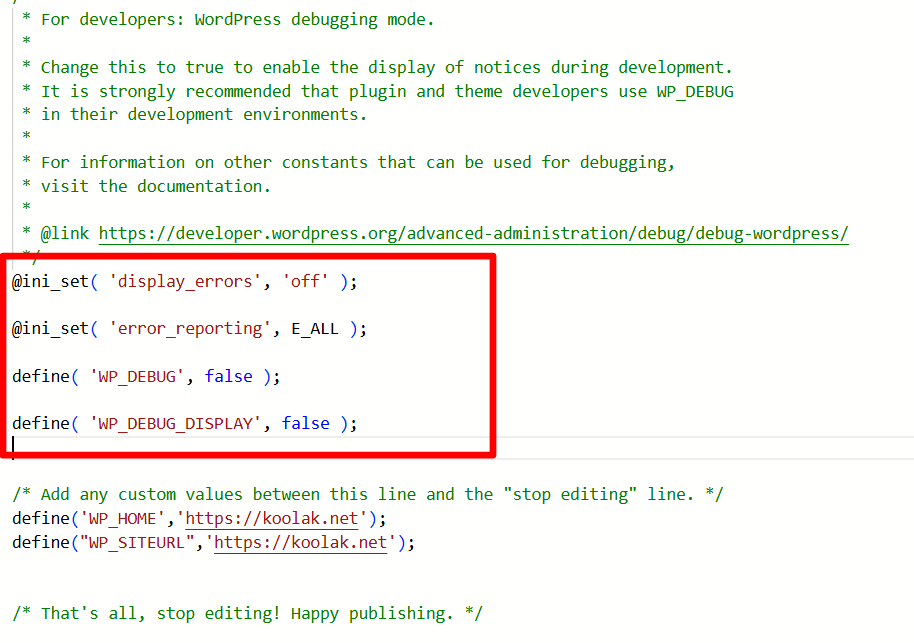
To completely disable all error output, replace your existing debug code in wp-config.php with the following block:
@ini_set( 'display_errors', 'off' );

@ini_set( 'error_reporting', E_ALL );

define( 'WP_DEBUG', false );

define( 'WP_DEBUG_DISPLAY', false );
This tells both WordPress and PHP itself to stop showing errors to your visitors. It’s a more reliable, bulletproof solution, especially on shared hosting or less configurable servers.

Important: These changes only hide the errors from the public view. If there are serious issues on your site, they still exist—you just won’t see them on the front end. So it’s a good idea to check your error logs occasionally through your hosting control panel.
Why Debug Mode Gets Left On (And Why It’s a Problem)
You might be wondering: “If debug mode can be risky, why is it turned on in the first place?”
Here are a few common reasons:
- A developer was troubleshooting something and forgot to turn it off.
- A plugin or theme update automatically enabled it during testing.
- You accidentally enabled it while following a tutorial.
While this might seem harmless, leaving debug mode on by mistake is one of the most overlooked issues that affects site credibility. Visitors don’t want to see error messages—they want a clean, trustworthy experience. If they feel like your site is broken or insecure, they’re likely to bounce.
This is especially critical for online stores, membership sites, or businesses that rely on user trust. Don’t let a simple mistake hurt your brand’s reputation.
A Real-World Example
Let’s say you run a small online store built on WooCommerce. One day, you install a new plugin to help with SEO, but something’s not working right. You turn on debug mode to look for conflicts—and you find a couple of notices about deprecated functions. Great! You report them to the plugin developer and get a fix.
But then… you forget to turn debug mode off.
Now, every visitor to your site sees strange warnings on your homepage. Some might think your site’s been hacked. Others might just get confused and leave. Meanwhile, you’re losing potential sales without even realizing it.
That’s how quickly a useful developer tool can turn into a UX disaster.
Keep Your Site Clean and User-Friendly
Debug mode is a great tool—when used the right way. But on a live WordPress site, it should be treated like a wrench, not a decoration. Use it when you need it, then put it away as soon as you’re done and disable debug in WordPress immediately.
To sum it up:
- Only enable debug mode when you’re actively troubleshooting.
- Always turn it off when your site goes live or after finishing a fix.
- Use the full code snippet to ensure all errors are hidden from visitors.
- Regularly check error logs privately instead of showing them on the site.
Take Control of Your Site’s Health
Keeping WordPress debug mode turned off is one of those small but crucial tasks that many site owners overlook. It’s quick, easy, and can significantly improve the way your site looks and feels to visitors.
So take a moment to check your settings—especially if you’ve recently worked with a developer or installed new plugins. A clean site is a trusted site, and your users deserve that. We have A full article about wordpress security, you can read that too.
If you found this guide helpful, share it with other WordPress users or bookmark it for future reference. Little fixes like this go a long way in keeping your site running smoothly and professionally.
