If you need to create a new WordPress admin user but cannot access the WordPress dashboard, you can add a user directly through the database using phpMyAdmin. This step-by-step guide will walk you through the process.
Table Of Contents
Why Should You Create a WordPress Admin User via phpMyAdmin?
sometimes due to errors or actions taken by security plugins, logging in with your WordPress admin credentials may not grant you access to the wp-admin area. Instead, you might be redirected to the front-end of your website, just like a regular user. In such cases, you can create a new WordPress admin user via phpMyAdmin and log in with your newly created admin account. In this guide, we will walk you through the entire process.
Steps to Add a WordPress Admin User via phpMyAdmin
Access phpMyAdmin
- Log in to your hosting control panel.
- Navigate to phpMyAdmin and open it.
- Select your WordPress database.
- If you’re unsure which database is used, check your wp-config.php file for the database name.
Insert a New Admin User in the wp_users Table

- Locate the wp_users table (if your database uses a custom prefix, it may appear as yourprefix_users).
- Click Insert at the top.
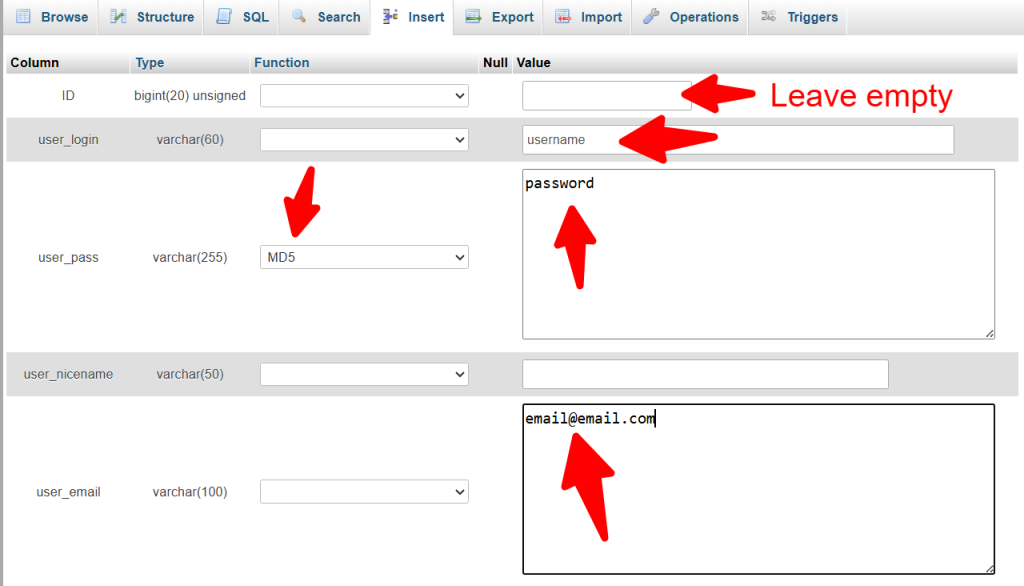
- Fill out the required fields:
- ID: Enter an available ID (you will use this later).
- user_login: Choose a username.
- user_pass: Enter a password and set the function dropdown to MD5 (important for encryption).
- user_nicename: Enter a user-friendly name (e.g., your-name).
- user_email: Provide an email address.
- user_status: Set this to 0.
- display_name: Enter the user’s display name.
- Click Go to insert the user.

Get The ID of Newly Created User
you can see the user id on result page after clicking the “GO” button, you must copy it in order to use it in next sections.

Assign Admin Capabilities in wp_usermeta
Now you should assign correct role to newly created user, you can read about User Roles in WordPress here.

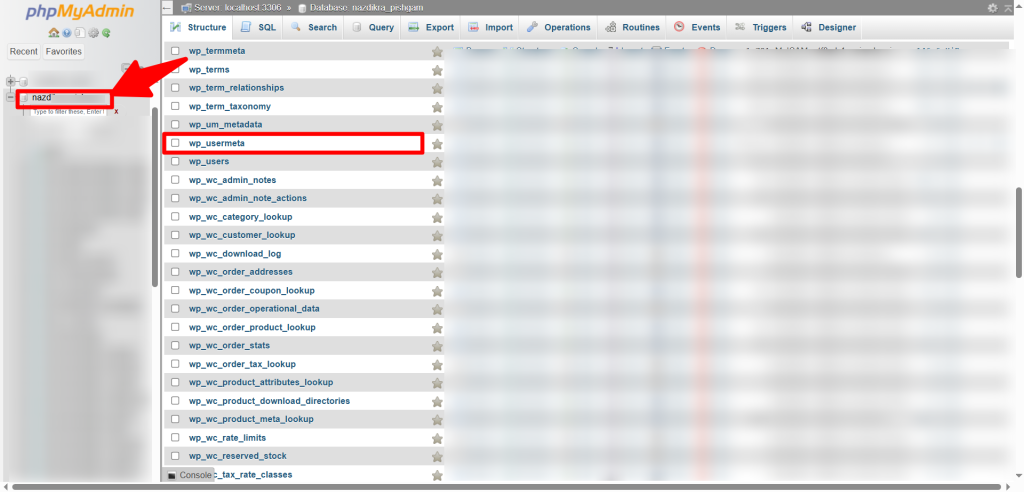
- Locate and open the wp_usermeta table (or yourprefix_usermeta).
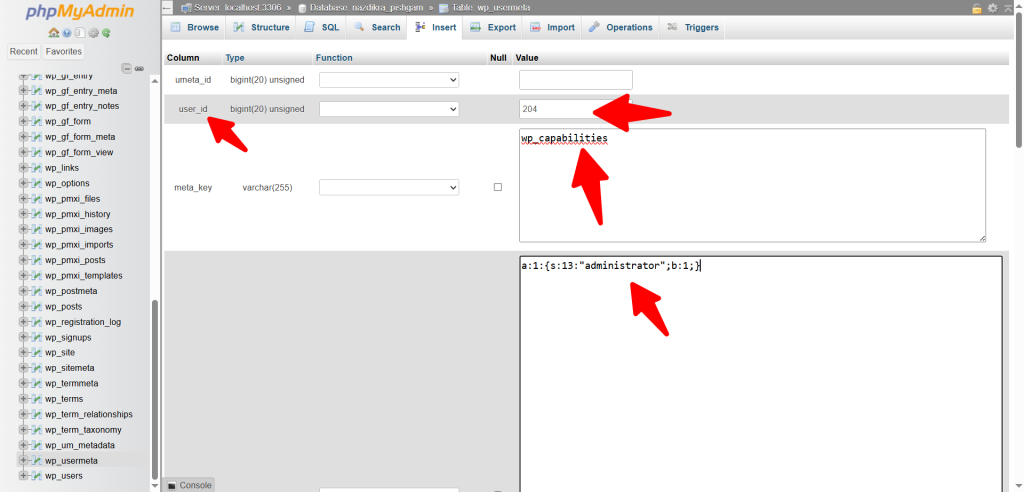
- Click Insert and enter the following details:
- user_id: Enter the same ID from step 2.
- meta_key: wp_capabilities
- meta_value: a:1:{s:13:”administrator”;b:1;}
- Click Go to save.

- Click Insert again and enter:
- user_id: Same ID as before.
- meta_key: wp_user_level
- meta_value: 10
- Click Go to complete the process.

- Verify and Log In
- Try logging in with the new credentials.
- If access is denied, double-check all steps, especially the user_pass encryption and wp_capabilities value.
Additional Notes
Enable the Visual Editor (If Disabled)
If the new user cannot access the visual editor in WordPress:
From the WordPress Dashboard:
- Log in as the new admin user.
- Click the username at the top right.
- Select Edit My Profile.
- Ensure Disable the visual editor when writing is unchecked.
From phpMyAdmin:
- Open the wp_usermeta table.
- Click Insert and enter:
- user_id: Same as in previous steps.
- meta_key: rich_editing
- meta_value: true
- Click Go to save.
Conclusion
By following these steps, you can successfully add an admin user to your WordPress website without accessing the dashboard. If you experience issues, verify the database prefix and ensure each step was followed correctly.
FAQs About How to Create a WordPress Admin User via phpMyAdmin: Step-by-Step Guide
Q: Can You Create an admin user from database tables in wordpress?
A: Yes, You can create an admin user easily from database tables
Q: Why Should You Create a WordPress Admin User via phpMyAdmin?
A: sometimes due to errors or actions taken by security plugins, logging in with your WordPress admin credentials may not grant you access to the wp-admin area.In such cases, you can create a new WordPress admin user via phpMyAdmin
Q: Which tables related to creating users in WordPress database?
A: you can create users from wp_users (wp_ is default the prefix selected in installation process) and you can use wp_usermeta is used for meta data about some users.
